- Overview
- Components
- Hardware Setup
- Headless Raspberry Pi Setup
- Configure the Raspberry Pi
- Setup Node-Red
- Running
Overview
This year, we are setting up Halloween scenes that are triggered by motion. As someone passes by the scene, the scene is triggered. We are using QLab to control our scenes. QLab is show control software for the Mac.
I wanted the ability to trigger QLab’s playback, from motion sensors, wirelessly. QLab supports trigger notifications via OSC (Open Sound Control) network commands.
I-CubeX recently released the PiShield for the Raspberry Pi that supports interfacing sensors to the Raspberry Pi. The Raspberry Pi supports Node-Red, which is a programming tool for wiring together hardware devices, APIs and online services. Node-Red will be able to convert sensor data to OSC messages. The Raspberry Pi Zero W supports Wi-Fi and will be able to transmit the sensor data wirelessly to QLab.
I have had really good success using the Ubiquiti UniFi line of Wi-Fi access points. I use the UAP-AC-M for outdoors. This works well when requiring outdoor motion sensors. For indoors, I use the UAP-AC-PRO and UAP-AC-HD.
I primarily wanted to keep track of the steps I took to set this up.
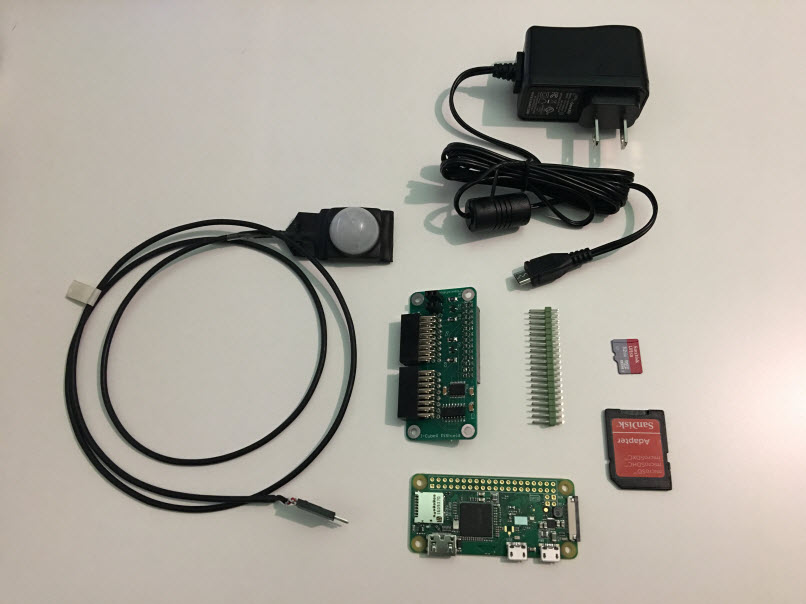
Components
The following components are required for this setup.
- Raspberry Pi Zero W
- Raspberry Pi Power Supply
- 8GB Micro SD Card
- Micro SD Card Reader/Writer
- I-CubeX PiShield
- Board-To-Board Connector
- Motion Sensors - Up to 8 are supported
- QLab
- Wireless Wi-Fi Network
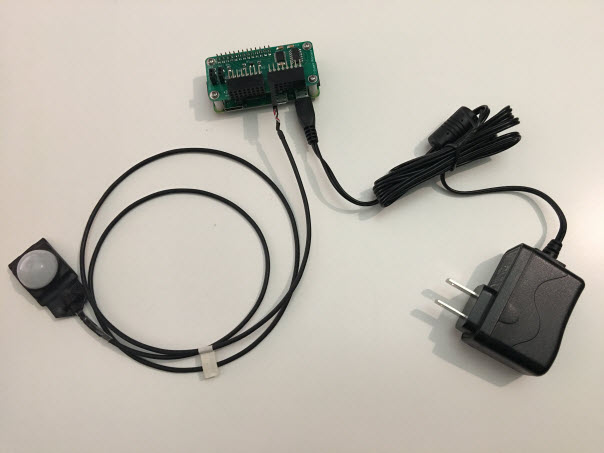
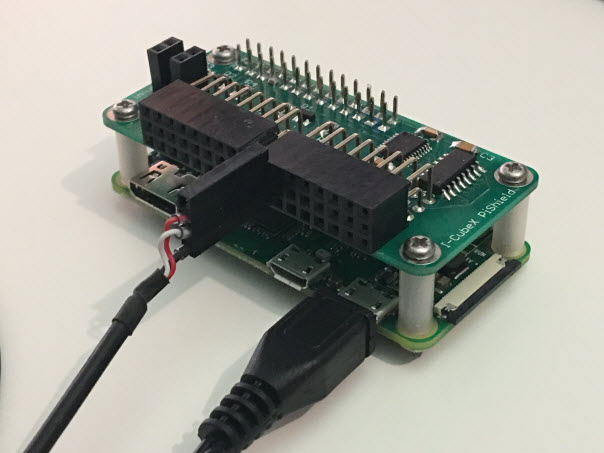
Hardware Setup
Setup the Raspberry Pi and the PiShield following the directions here. In the case of the Pi Zero, the male header will need to be soldered to the board. The final result should look as follows:
Headless Raspberry Pi Setup
I opted for setting up the Raspberry Pi without using a keyboard or monitor attached to the Raspberry Pi. This simplifies the overall setup as an extra keyboard and monitor is not needed. I referenced this blog post for initial information.
Step 1: Download Raspbian
You can download Raspbian image from here. Download Raspbian Jessie with Pixel. The Lite version may work, but I have not tried it. At the time of this writing, I downloaded the April 2017 version.
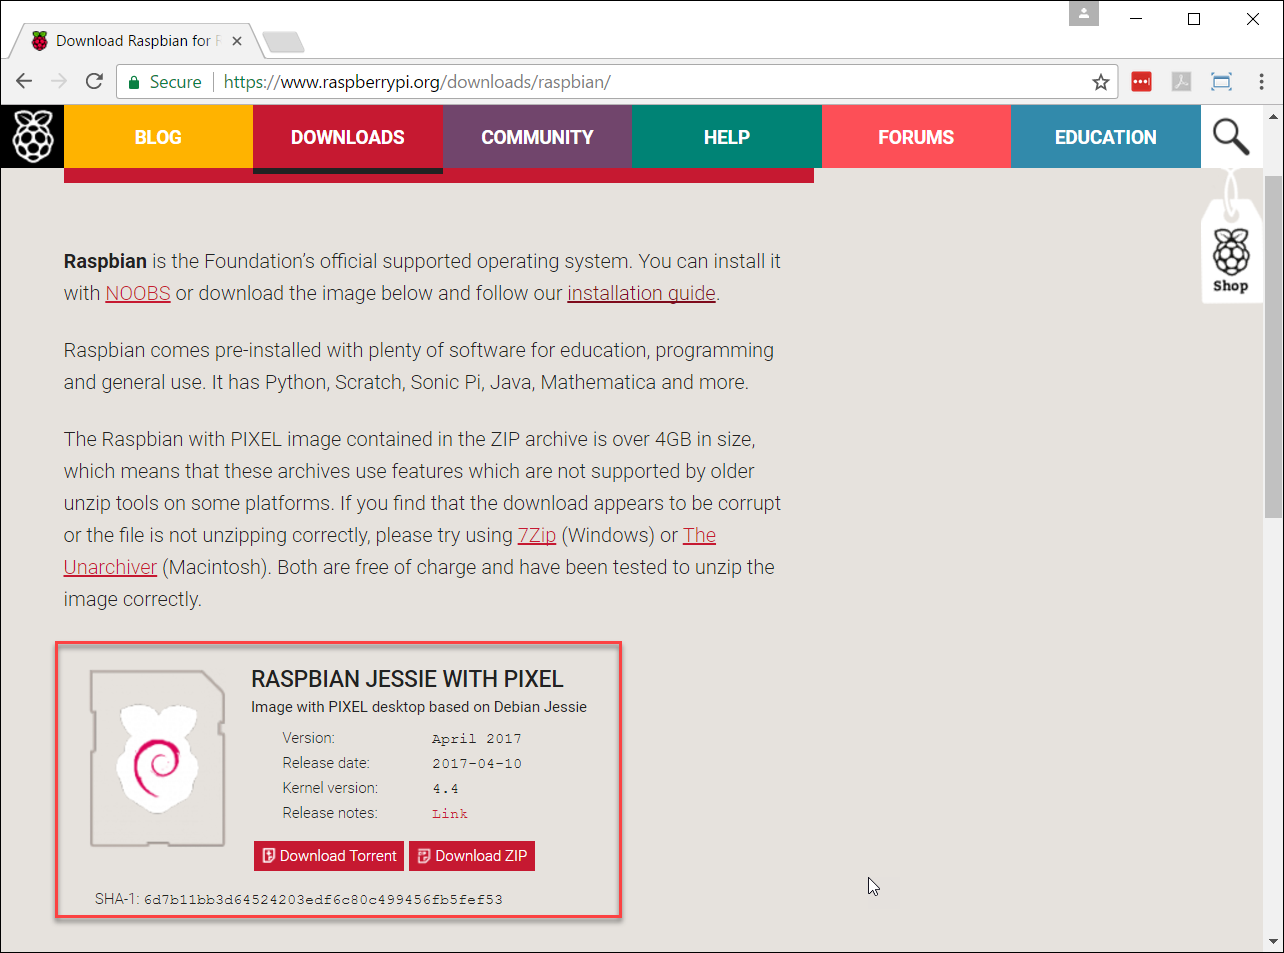
Unzip the downloaded file. You should have an .iso file similar to the name 2017-04-10-raspbian-jessie.img
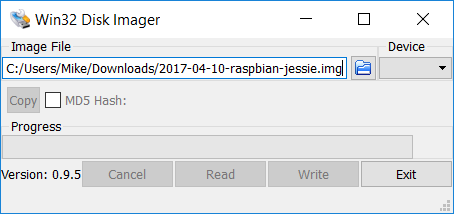
Step 2: Write ISO Image to SD Card
The Raspbian image needs to be written to the SD card so the Raspberry Pi can boot off the image. Win32 Disk Imager can be used to write the ISO image to an SD card on Windows. Etcher can also be used which supports Mac, Linux, and Windows. Instructions are here.
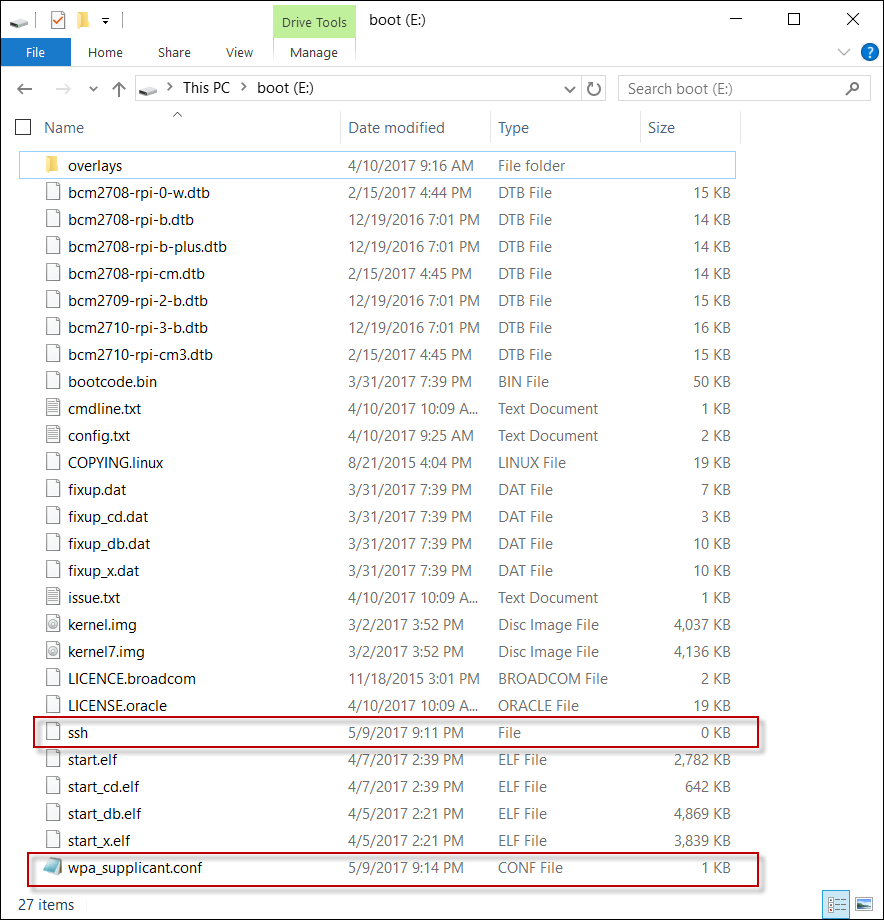
Step 3: Enable SSH and Configure Wi-Fi
In order to initially allow SSH access to the Raspberry Pi, an empty ssh file needs to be added to the root of the boot partition on the SD card.
To support Wi-Fi, create a wpa_supplicant.conf file that contains your Wi-Fi settings. This file also needs to be added to the root of the boot partition on the SD card. The contents of the file should be as follows:
ctrl_interface=DIR=/var/run/wpa_supplicant GROUP=netdev
update_config=1
network={
    ssid="SSID"
    psk="PASSWORD"
}
Update SSID and PASSWORD with your Wi-Fi info. Add the files to the root folder of the SD card:
Step 4: Boot the Raspberry Pi
Insert the SD you prepared into the Raspberry Pi. Power on the Raspberry Pi by plugging in the power.
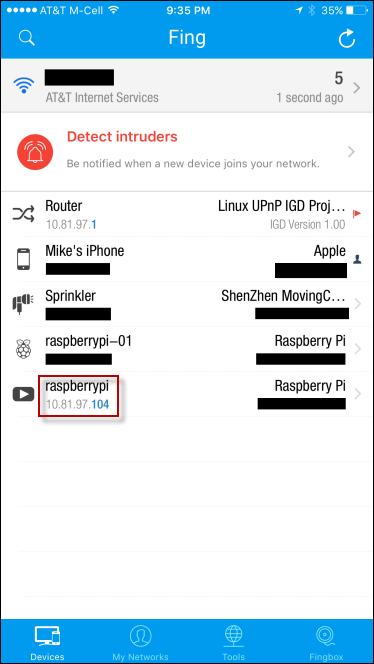
Step 5: Determine the IP address of the Raspberry Pi
You can use an app such as Fing to discover the IP address of your Raspberry Pi. Alternatively, you can look at what IP address your router assigned to the Raspberry Pi. Remember this IP address as you will need it later.
Configure the Raspberry Pi
We need to configure and install the appropriate software onto the Raspberry Pi for the setup to work.
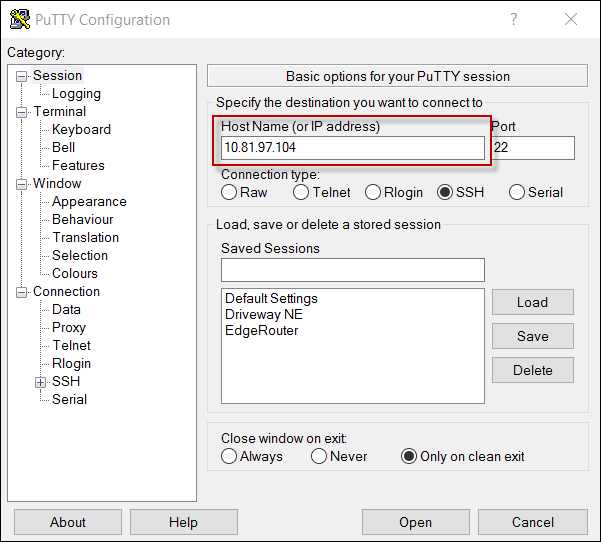
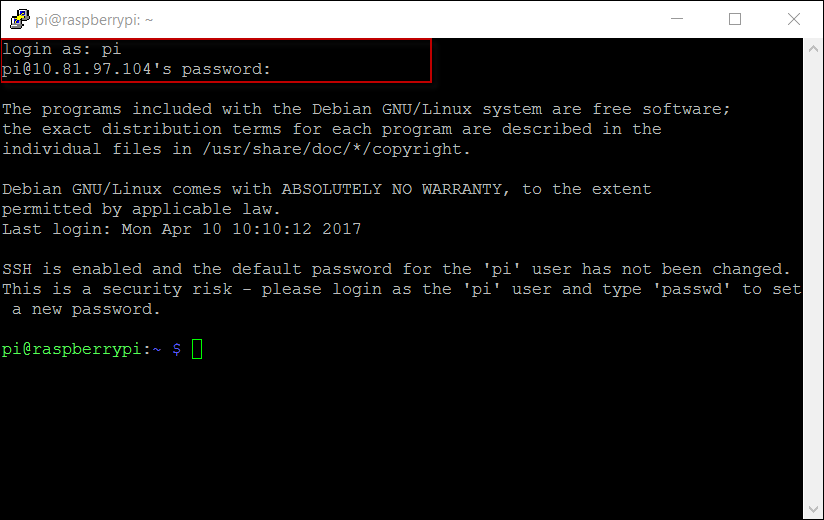
Step 1: SSH into the Raspberry Pi
Because we are using a Headless setup, we will setup and configure the Raspberry Pi over SSH. Putty is the Windows client I typically use for SSH sessions. Connect to the Raspberry Pi using the IP address previously discovered.
The default credentials are:
login as: pi
password: raspberry
Step 2: Basic Configuration
Set the clock. The current date cannot not be too many days off, otherwise the NTPD (automatically sets the time) service will not set the actual date. Set the date to the current date: Note: replace 2017-05-10 with the current date
sudo date -s "2017-05-10"
Configure the basic settings of the Raspberry Pi. Run the following command:
sudo raspi-config
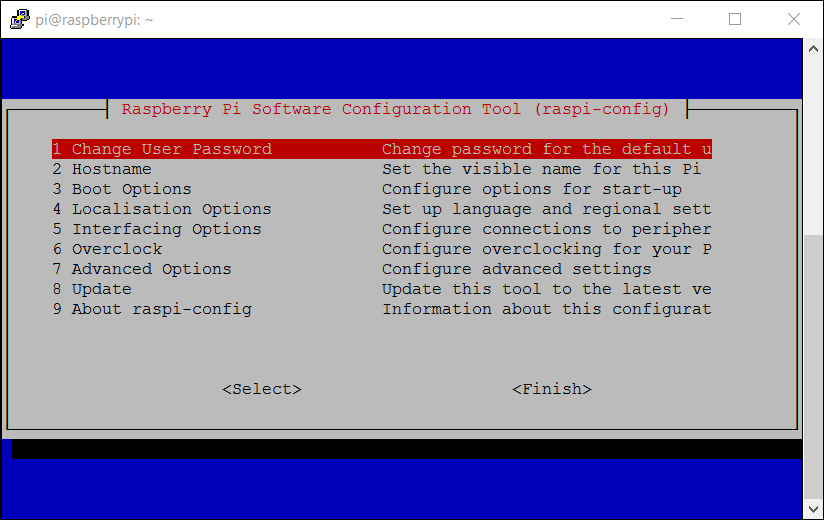
Using the Raspberry Pi Software Configuration Tool (shown above), configure the following:
- Boot Options > Desktop / CLI > Console
- Boot Options > Wait for Network at Boot > Yes
- Localisation Options > Change Locale > [en_US.UTF-8 UTF-8]
- Localisation Options > Change Timezone > [US > Eastern]
- Interfacing Options > SPI / YES
- Interfacing Options > IC2 / YES
- Select Finish / Yes to Reboot
Reconnect to the Raspberry Pi after reboot via SSH.
Step 3: Update and Upgrade Raspbian
Make sure Raspbian is up to date. Run the following commands:
sudo apt-get update
sudo apt-get upgrade
Step 4: Install Node-Red
Node-Red comes pre-installed on Raspbian with Pixel. We need to update Node-Red and install required add-ons.
To upgrade Node-Red, run the following command. This may take a while.
update-nodejs-and-nodered
Create the .node-red folder to hold the add-ons
cd ~
mkdir .node-red
Install Node-Red mcp3008 support. iCube-x Reference
cd ~/.node-red
npm install mcp3008
Install Node-Red OSC support.
cd ~/.node-red
npm install node-red-contrib-osc
Set Node-Red to Auto Start when booting up the Raspberry Pi
cd ~
sudo systemctl enable nodered.service
Start Node-Red in background (Node-Red will start automatically on next boot.)
node-red-start&
Setup Node-Red
Now, we need to configure Node-Red to read the motion sensor(s) and send OSC commands to QLab.
The examples below cover 1 motion sensor. Multiple sensors can be used following the same process.
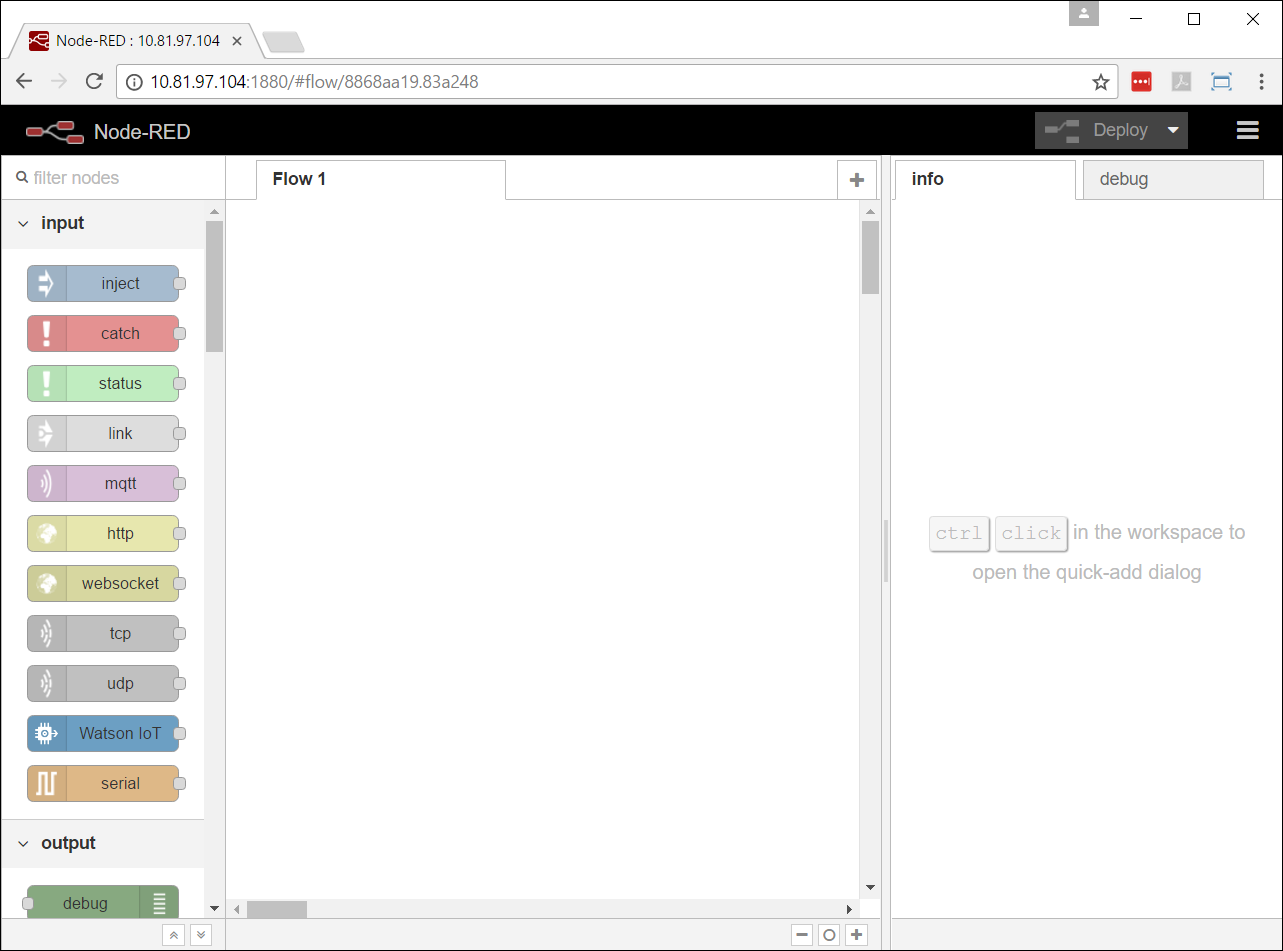
Step 1: Connect to Node-Red
Node-Red runs on the default port of 1880. To access node-red open a browser and navigate to http://[Raspberry Pi IP Address]:1880/.
Note: use the IP address you determined earlier.
Step 2: Sensor Acquisition
First we need to acquire the values from the motion sensor. I followed the example from here to get started.
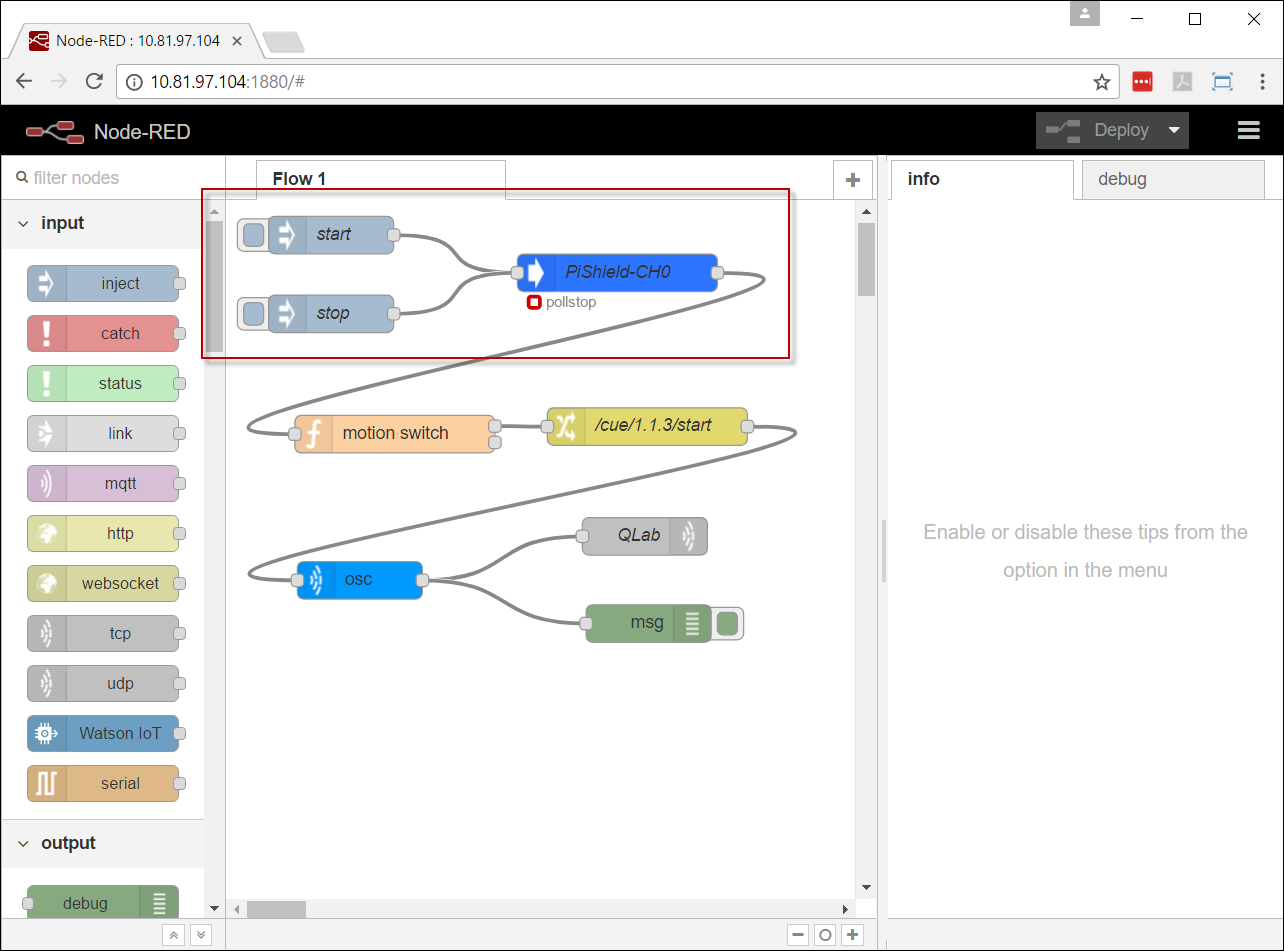
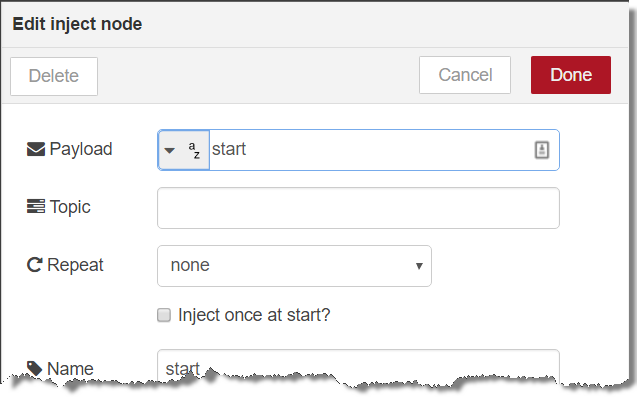
The start and stop are  nodes with the following settings:
The PiShield-CH0 is a  node with the following settings:
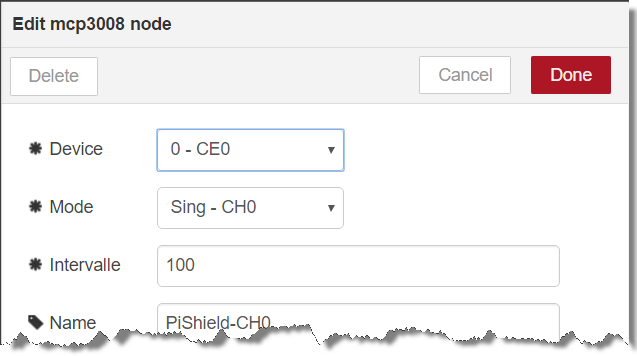
The Mode field is set to read the sensor plugged into channel 0.
Clicking start will start the polling of the sensor(s). Clicking stop will stop the polling of the sensor(s).
Remember to always click start for everything to run.
Step 3: Send OSC Commands
The next step is to use the results from the sensor acquisition to send OSC commands. The mcp3008 node polls the sensor(s) every 100ms and the value(s) are sent to subsequent nodes. The resulting values need to be interpreted into motion or no motion. Only the transitions between motion and no motion should be passed on. The transition from no motion to motion, can then be converted into an OSC message and sent to QLab.

The motion switch is a  node.
Custom code is used to detect changes in motion and trigger 1 of 2 outputs.
The first output sends a message when motion starts.
The second output sends a message when motion ends.
Settings are as follows:
node.
Custom code is used to detect changes in motion and trigger 1 of 2 outputs.
The first output sends a message when motion starts.
The second output sends a message when motion ends.
Settings are as follows:
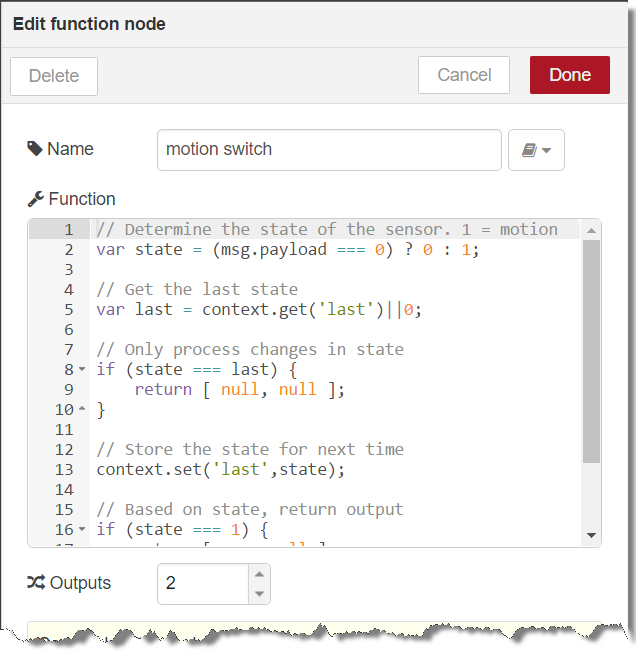
The complete code is
// Determine the state of the sensor. 1 = motion
var state = (msg.payload === 0) ? 0 : 1;

// Get the last state
var last = context.get('last')||0;

// Only process changes in state
if (state === last) {
    return [ null, null ];
}

// Store the state for next time
context.set('last',state);

// Based on state, return output
if (state === 1) {
    return [ msg, null ];
} else {
    return [ null, msg ];
}
I used this reference to develop the code.
The /cue/… is a  node that converts the message to OSC data.
The OSC Path is set using msg.topic.
In this example, the payload is not needed.
It is connected to the motion started output of the motion switch node.
The settings are as follows:
node that converts the message to OSC data.
The OSC Path is set using msg.topic.
In this example, the payload is not needed.
It is connected to the motion started output of the motion switch node.
The settings are as follows:
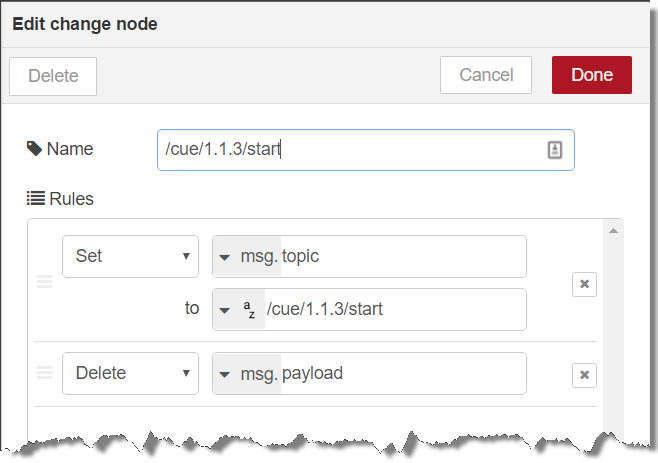
I used this and this reference to determine the OSC message to send to QLab. In this case the message triggers playback of cue #1.1.3 You can update this to whatever OSC command you want to send to QLab.
Next the  node converts the data to an OSC message
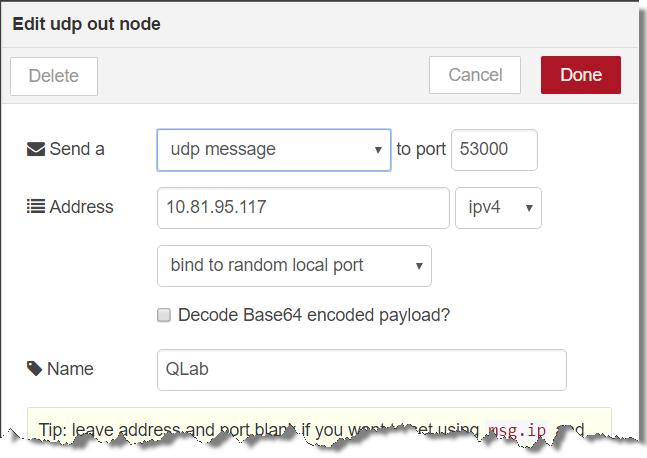
Finally the QLab node, which is a  , sends the OSC message to QLab.
This the IP Address and OSC Port of QLab are registered here.
Use the same method to get the IP address of the QLab Mac as used to determine the Raspberry Pi IP Address.
Port 53000 is the default port QLab uses to receive OSC messages.
Here are the settings used in my case:
, sends the OSC message to QLab.
This the IP Address and OSC Port of QLab are registered here.
Use the same method to get the IP address of the QLab Mac as used to determine the Raspberry Pi IP Address.
Port 53000 is the default port QLab uses to receive OSC messages.
Here are the settings used in my case:
Be sure to click the  button to save changes.
The complete Node-Red settings are as follows:
[
    {
        "id": "8868aa19.83a248",
        "type": "tab",
        "label": "Flow 1"
    },
    {
        "id": "a2b77e56.ec95f",
        "type": "mcp3008",
        "z": "8868aa19.83a248",
        "name": "PiShield-CH0",
        "device": "/dev/spidev0.0",
        "mode": "0x80",
        "interval": "100",
        "x": 313.1000099182129,
        "y": 75.00000381469727,
        "wires": [
            [
                "19ecaf33.969551"
            ]
        ]
    },
    {
        "id": "125a1636.bf6a1a",
        "type": "inject",
        "z": "8868aa19.83a248",
        "name": "start",
        "topic": "",
        "payload": "start",
        "payloadType": "str",
        "repeat": "",
        "crontab": "",
        "once": false,
        "x": 84.10000610351562,
        "y": 44.800002098083496,
        "wires": [
            [
                "a2b77e56.ec95f"
            ]
        ]
    },
    {
        "id": "7158a004.84109",
        "type": "inject",
        "z": "8868aa19.83a248",
        "name": "stop",
        "topic": "",
        "payload": "stop",
        "payloadType": "str",
        "repeat": "",
        "crontab": "",
        "once": false,
        "x": 84.10000991821289,
        "y": 107.80000495910645,
        "wires": [
            [
                "a2b77e56.ec95f"
            ]
        ]
    },
    {
        "id": "8706555e.921028",
        "type": "osc",
        "z": "8868aa19.83a248",
        "name": "",
        "path": "",
        "metadata": false,
        "x": 107.1001091003418,
        "y": 320.99999618530273,
        "wires": [
            [
                "57b9f7c4.cd8a08",
                "c5d32123.e0512"
            ]
        ]
    },
    {
        "id": "57b9f7c4.cd8a08",
        "type": "udp out",
        "z": "8868aa19.83a248",
        "name": "QLab",
        "addr": "10.81.95.117",
        "iface": "",
        "port": "53000",
        "ipv": "udp4",
        "outport": "",
        "base64": false,
        "multicast": "false",
        "x": 335.1000099182129,
        "y": 285.80002212524414,
        "wires": []
    },
    {
        "id": "c5d32123.e0512",
        "type": "debug",
        "z": "8868aa19.83a248",
        "name": "",
        "active": true,
        "console": "false",
        "complete": "true",
        "x": 335.1000099182129,
        "y": 356.5999984741211,
        "wires": []
    },
    {
        "id": "150291d7.947bde",
        "type": "change",
        "z": "8868aa19.83a248",
        "name": "/cue/1.1.3/start",
        "rules": [
            {
                "t": "set",
                "p": "topic",
                "pt": "msg",
                "to": "/cue/1.1.3/start",
                "tot": "str"
            },
            {
                "t": "delete",
                "p": "payload",
                "pt": "msg"
            }
        ],
        "action": "",
        "property": "",
        "from": "",
        "to": "",
        "reg": false,
        "x": 337.1000099182129,
        "y": 198.00002098083496,
        "wires": [
            [
                "8706555e.921028"
            ]
        ]
    },
    {
        "id": "19ecaf33.969551",
        "type": "function",
        "z": "8868aa19.83a248",
        "name": "motion switch",
        "func": "// Determine the state of the sensor. 1 = motion\nvar state = (msg.payload === 0) ? 0 : 1;\n\n// Get the last state\nvar last = context.get('last')||0;\n\n// Only process changes in state\nif (state === last) {\n    return [ null, null ];\n}\n\n// Store the state for next time\ncontext.set('last',state);\n\n// Based on state, return output\nif (state === 1) {\n    return [ msg, null ];\n} else {\n    return [ null, msg ];\n}\n",
        "outputs": "2",
        "noerr": 0,
        "x": 135.10006713867188,
        "y": 204.19998741149902,
        "wires": [
            [
                "150291d7.947bde"
            ],
            []
        ]
    }
]
Running
- Make sure the sensor(s) are plugged in and the Raspberry Pi is powered on.
- Navigate to http://[RASPBERRY PI IP ADDRESS]:1880/
- Click the Start (inject node)
- The Raspberry Pi will now send OSC commands to QLab.